
Many of our clients have a dream of one day buying a piece of land and building their dream home on it.
It’s a very compelling vision, and it’s our job to fill in the steps to help them do it properly and stay safe. This is one of those situations where not knowing what you don’t know can really come back to bite you.
Like we always say to clients, “Surprises are nice for birthday parties, but they have no place in a real estate transaction.”
Here’s a step-by-step plan that we use to help people stay organized, and to help them understand many of the hidden costs involved with building their dream home.
Step 1: Examine the land restrictions
Determine if there are any conservation, wetland, Escarpment or other restrictions on the land. Mostly this is just having area knowledge, but there are maps available by region.
Step 2: Provincial & Regional Plans
Start from the top and work your way down. Check with the Provincial authorities, then drill down to the Regional website to look at the latest Official Plan to see what the area could look like in 5, 10, 15, 20, 25 years.
Step 3: Determine the Zoning for the property
Then you find out the City/Town Zoning of a property, usually by finding the map on the Town website.
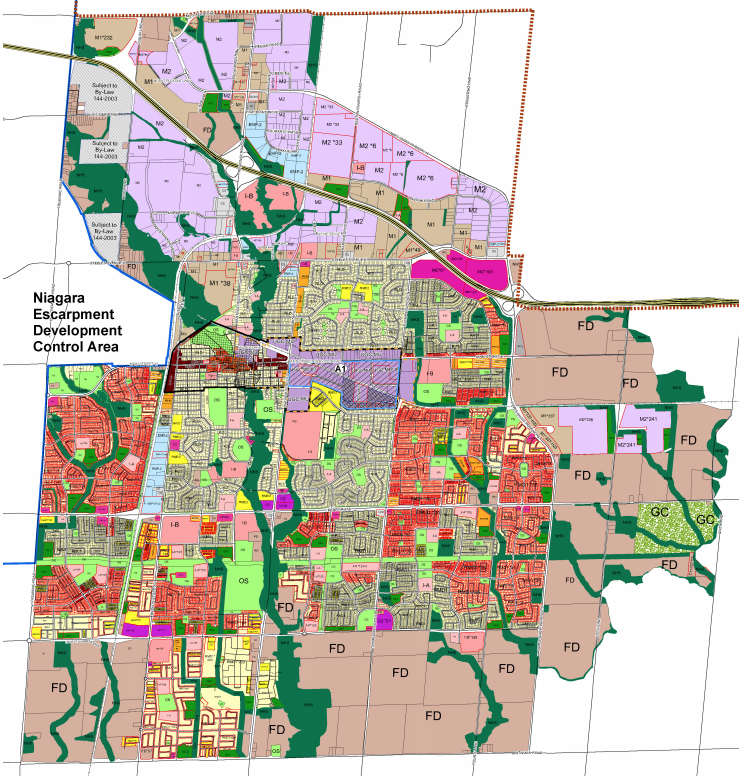
Step 4: Examine the Zoning guidelines
The text version of the Zoning will explain what all of the codes in the map mean. Here are the text versions of the Zoning by-laws for Milton’s urban and rural areas.
You can read about details like:
-
- Maximum lot coverage (the “footprint” of what you can build)
- Front and side setbacks from the edge of the lot
- Maximum height of the building
- Allowable uses
- Allowable home-based businesses
Here are just a few examples of zones you’ll see on the map:
FD = future development, RLD/RMD/RHD = residential low, medium and high-density, CBD = commercial business district, I-A is institutional like school or church, OS = open space, NHS = natural heritage/conservation
Try to work backwards and figure out the size of home you want to build, and then begin searching for the right size of land based on the “maximum lot coverage”.
Example: Old Milton Custom Home Build
Here’s a VERY common scenario when building in Old Milton. Standard lot size is 66′ x 132′, or 8,712 square feet.
By the way, the multiples of 66′ have special historical meaning, if you’re interested in some extra reading.
Under current Milton RLD zoning, you are permitted to build a footprint (including garage) of up to 25% of the total area for this size of lot. That’s 2,178 square feet. If a built-in double garage is approximately 20 x 20, or 400 square feet, the total indoor floor space allowable would be capped out at just under 4,000 square feet.
If your plans fit within the zoning guidelines, then you should be issued a permit, provided your drawings are all fine.
Generally getting a permit is about $1 per square foot, but can vary by area.
If you want to do MORE, like build using more lot coverage than the zoning allows, then you get into applying to Committees of Adjustment, Variances, and changing Zoning.
This can cost thousands of dollars and take 6-12 months or longer. Highly suggest avoiding this if you can.
Step 5: Check for servicing
Then you check to see if the lot is serviced (typically hydro, natural gas, cable TV, Internet). If it’s not, inquiries must be made with the local authorities to explore options and costs. It’s helpful to know if the utilities exist at the front of the property, because otherwise it’s big $$$ for them to run lines from another location.
If no well and septic, you could be anywhere between $20,000 to $60,000 combined for those.
Step 6: Examine costs to build
A custom-built home could range anywhere between $150 to $500 per square foot, depending on the architectural features, location and quality of finishes.
Will you be the general contractor, or use someone else to act in a leadership role for the trades? Will you bring on a designer? What about extra budgeting for furniture and finishes? Remember to budget for fencing and landscaping.
This is the one section where you can really get stuck if you don’t budget properly. It’s not a bad idea to keep an extra 20-30% of the total build cost set aside for surprises.
Although it’s not required for your own build, it’s advisable to register as a builder with Tarion, but at a minimum you’ll need a Tarion Letter of Confirmation. Brand new construction will be subject to HST, whereas a major renovation on an existing structure would not. Please speak to your accountant about potential tax implications.
Step 7: Development charges
The City/Town and the Region will also usually charge a development fee. These can be anywhere from $20,000 to $70,000 depending on the area. This goes into building infrastructure, schools, roads, etc.
Here’s a list of development charges in Milton.
Step 8: Financing
If you’re buying completely vacant land, most lenders are going to require a significant amount of downpayment, sometimes up to 50%.
If you buy land with an existing structure, you may be able to pursue more traditional financing with lower downpayments. But keep in mind that you may have to demolish the existing building, which is usually an additional $20,000 to $30,000.
If you sell your home to obtain the funds needed to build, then you may be paying extra costs to rent another home temporarily, and also to carry the mortgage on the existing land.
Special construction financing may be available through mortgage brokers. Funds are often released at certain phases of the building process. Make sure everything is in writing to avoid any complications down the road.
How does THAT sound?
Was that scary?
It’s usually more than what most people expect. But thousands of people build their homes every year, and it’s VERY possible.
Want to begin exploring the possibility of building YOUR dream home? Just reach out to our team for a chat.